Debian环境下架设L2TP/IPSec
|
1 |
sudo apt-get install openswan |
|
1 2 |
sudo mv /etc/sysctl.conf /etc/sysctl.conf.bak sudo vim /etc/sysctl.conf |
|
1 2 3 4 |
net.ipv4.ip_forward = 1 net.ipv4.conf.all.accept_redirects = 0 net.ipv6.conf.all.accept_redirects = 0 net.ipv4.conf.all.send_redirects = 0 |
|
1 2 3 4 5 6 |
sysctl -p for each in /proc/sys/net/ipv4/conf/* do echo 0 > $each/accept_redirects echo 0 > $each/send_redirects done |
用文字编辑工具(如vim)打开/etc/ipsec.conf,改成如下样式:
|
1 2 3 4 5 6 7 8 9 10 11 12 13 14 15 16 17 18 19 20 21 22 23 24 25 26 |
version 2.0 config setup nat_traversal=yes virtual_private=%v4:10.0.0.0/8,%v4:192.168.0.0/16,%v4:172.16.0.0/12 oe=off protostack=netkey conn L2TP-PSK-NAT rightsubnet=vhost:%priv also=L2TP-PSK-noNAT conn L2TP-PSK-noNAT authby=secret pfs=no auto=add keyingtries=3 rekey=no ikelifetime=8h keylife=1h type=transport left=YOUR.SERVER.IP.ADDRESS leftprotoport=17/1701 right=%any dpddelay=40 dpdtimeout=130 dpdaction=clear |
用文字编辑器打开/etc/ipsec.secrets,改成如下格式:
|
1 |
你的服务器的ip地址 %any: PSK "自定义密钥" |
把上面中文部分的东西替换成你自己的,保存。
然后运行以下命令:
|
1 2 3 4 5 |
for each in /proc/sys/net/ipv4/conf/* do echo 0 > $each/accept_redirects echo 0 > $each/send_redirects done |
检查一下 IPSec 能否正常工作:
|
1 |
ipsec verify |
除了最后一行Opportunistic Encryption Support可能显示为[DISABLED]外,其他全应该是OK,如果有遇到问题的请按照错误提示具体分析。
重启openswan
|
1 |
service ipsec restart |
或者
|
1 |
/etc/init.d/ipsec restart |
安装xl2tpd:
|
1 |
apt-get install xl2tpd |
用文字编辑器打开/etc/xl2tpd/xl2tpd.conf,改成这样:
|
1 2 3 4 5 6 7 8 9 10 11 12 13 |
[global] ipsec saref = yes [lns default] ip range = 10.0.2.2-10.0.2.255 local ip = 10.0.2.1 ;require chap = yes refuse chap = yes refuse pap = yes require authentication = yes ppp debug = yes pppoptfile = /etc/ppp/options.xl2tpd length bit = yes |
注意ip range里面出现的IP避免和已使用的IP重复,如果发现有重复就错开一个段即可。
如果你之前没有在服务器上安装过pptpd,那么下面这一步你要进行安装:
|
1 |
apt-get install pptpd |
然后配置/etc/ppp/options.xl2tpd,如果没有就新建一个,内容如下:
|
1 2 3 4 5 6 7 8 9 10 11 12 13 14 15 16 17 |
require-mschap-v2 ms-dns 8.8.8.8 ms-dns 8.8.4.4 asyncmap 0 auth crtscts lock hide-password modem debug name l2tpd proxyarp lcp-echo-interval 30 lcp-echo-failure 4 mtu 1400 connect-delay 5000 noccp |
其中dns我设置的是google的公共dns服务器,可以自行修改。
使用文字编辑器编辑/etc/ppp/chap-secrets,添加或修改用户
格式是这样:每一行是一个用户的信息,第一部分是用户名,第二部分是所使用的服务,第三部分是密码,第四部分是允许的IP地址,一般来说第二部分可以设置成l2tpd,这样就完全限制这个账号只能使用l2tp登陆,同时因为pptp和l2tp两种登陆方式是可以共存并且同时使用的,第二部分也就可以设置成pptpd,当然,设置成通配符*也是可以的,意思是所有协议都可以使用这个账号登陆,例子如下:
|
1 2 3 4 5 |
yynotespptp pptpd yynotes * yynotesl2tp l2tpd yynotes * yynotes * yynotes * |
下面重启 xl2tpd:
|
1 |
service xl2tpd restart |
设置 iptables 的数据包转发:
|
1 2 3 4 |
iptables --table nat --append POSTROUTING --jump MASQUERADE iptables -t nat -A POSTROUTING -o eth0 -j MASQUERADE iptables -t nat -A POSTROUTING -s 10.0.2.0/24 -o eth0 -j MASQUERADE echo 1 > /proc/sys/net/ipv4/ip_forward |
如果是OVZ构架的VPS,需要另外的方法:
|
1 |
iptables -t nat -A POSTROUTING -o venet0:0 -j SNAT --to-source $vps ip |
设置自启动项,编辑/etc/rc.local,加入下面的语句:
|
1 2 3 4 5 6 7 8 9 10 11 |
iptables --table nat --append POSTROUTING --jump MASQUERADE echo 1 > /proc/sys/net/ipv4/ip_forward for each in /proc/sys/net/ipv4/conf/* do echo 0 > $each/accept_redirects echo 0 > $each/send_redirects done /etc/init.d/ipsec restart 注意第一句,如果是OVZ的换掉 |
常见问题处理:
错误1:pluto is running [FAILED]
|
1 2 3 4 5 6 7 8 9 10 11 |
Checking your system to see if IPsec got installed and started correctly: Version check and ipsec on-path [OK] Linux Openswan U2.6.38/K(no kernel code presently loaded) Checking for IPsec support in kernel [FAILED] SAref kernel support [N/A] Checking that pluto is running [FAILED] whack: Pluto is not running (no "/var/run/pluto/pluto.ctl") Checking for 'ip' command [OK] Checking /bin/sh is not /bin/dash [WARNING] Checking for 'iptables' command [OK] Opportunistic Encryption Support [DISABLED] |
错误2:NETKEY: Testing XFRM related proc values [FAILED]
|
1 2 3 4 5 6 7 8 9 10 11 12 13 14 15 16 17 18 19 20 21 22 23 |
Checking your system to see if IPsec got installed and started correctly: Version check and ipsec on-path [OK] Linux Openswan U2.6.38/K2.6.32-38-generic-pae (netkey) Checking for IPsec support in kernel [OK] SAref kernel support [N/A] NETKEY: Testing XFRM related proc values [FAILED] Please disable /proc/sys/net/ipv4/conf/*/send_redirects or NETKEY will cause the sending of bogus ICMP redirects! [FAILED] Please disable /proc/sys/net/ipv4/conf/*/accept_redirects or NETKEY will accept bogus ICMP redirects! [OK] Checking that pluto is running [OK] Pluto listening for IKE on udp 500 [OK] Pluto listening for NAT-T on udp 4500 [OK] Checking for 'ip' command [OK] Checking /bin/sh is not /bin/dash [WARNING] Checking for 'iptables' command [OK] Opportunistic Encryption Support [DISABLED] |
你可能忘记修改网络策略:
|
1 2 3 4 5 |
for each in /proc/sys/net/ipv4/conf/* do echo 0 > $each/accept_redirects echo 0 > $each/send_redirects done |
错误3:Pluto listening for IKE on udp 500 [FAILED]
|
1 2 3 4 |
Pluto listening for IKE on udp 500 [FAILED] Cannot execute command "lsof -i UDP:500": No such file or directory Pluto listening for NAT-T on udp 4500 [FAILED] Cannot execute command "lsof -i UDP:4500": No such file or directory |
那么你需要安装lsof:
|
1 |
apt-get install lsof |
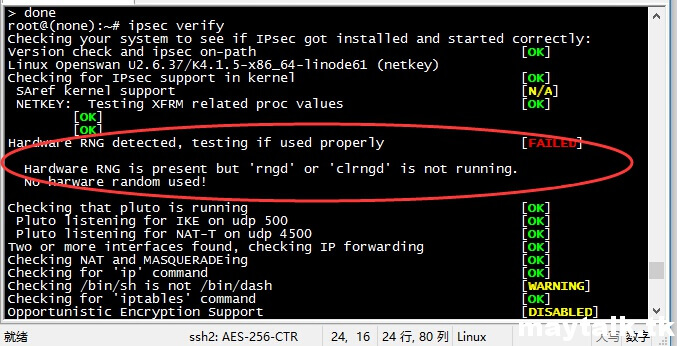
错误4,如图:
这个是在Lindon的vps上出现的错误,按照报错很好理解,有RNG这个硬件支持,但是没有“rngd”或者“clrngd”在运行,简单来说,就是这两个东西没有运行;
这是什么呢?
rngd服务---熵值
是Linux里面一种加密机制,随即数,因为ipsec也是一种加密的,因此需要它的支持,有兴趣的可以了解一下《Linux 系统中随机数在 KVM 中的应用》
具体操作可以按照下面的来:
|
1 2 3 4 5 6 7 8 9 10 |
[root@10-4-25-124 ~]# apt-get install rng-tools [root@10-4-25-124 ~]# echo 'EXTRAOPTIONS="--rng-device /dev/urandom"' >/etc/sysconfig/rngd [root@10-4-25-124 ~]# service rngd start Starting rngd: [ OK ] [root@10-4-25-124 ~]# chkconfig rngd on [root@10-4-25-124 ~]# chkconfig --list rngd rngd 0:off 1:off 2:on 3:on 4:on 5:on 6:off 或者 直接在/etc/rc.local中加入 rngd -r /dev/urandom -o /dev/random & |
我是使用的第二种方法,加到/etc/rc.local里面让它开机运行的,因为不知道为什么,按照第一种方法,会提示服务不存在或者未知。
完成后重启ipsec服务,然后就正常了,如图:
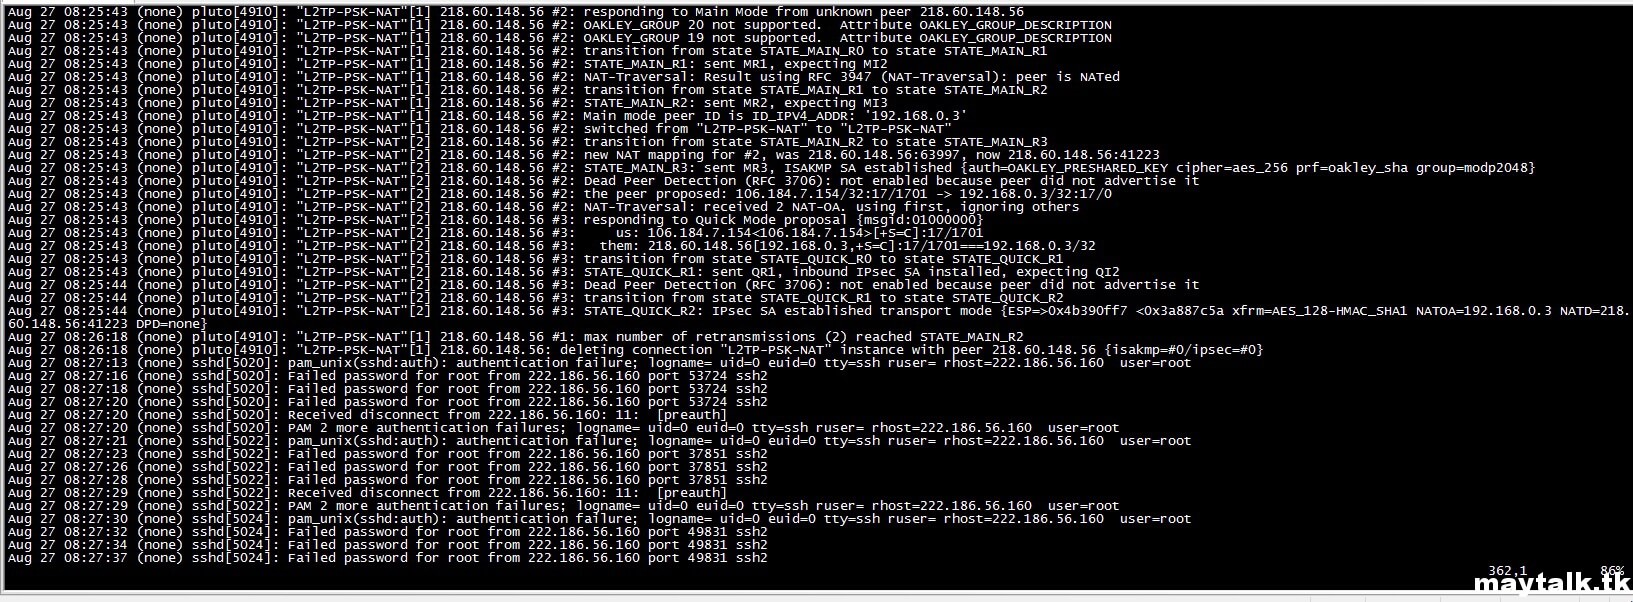
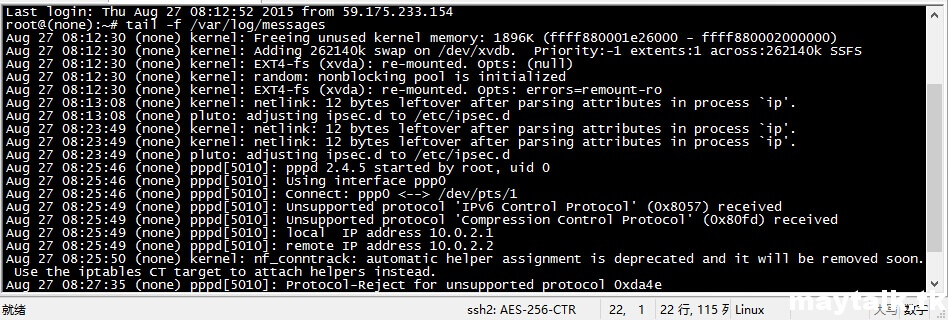
最后客户端连接的时候,可以看一下日志:
|
1 2 3 |
tail -f /var/log/auth.log 和 tail -f /var/log/messages |
第一个是看ipsec的验证过程,如果出现这个的话,就是过了ipsec的验证过程了:
这个过程过了后,就是xl2tp来分配ip了,就是看下面的那个日志了:
可以看到图中的local ip和remote ip了,这个就是已经分配了ip给客户端了,到这里就说明客户端正常连接了。
注意,如果出现如图所示的报错,IOS无法连接,如图:
同时检查配置文件,如图:
这个是openswan的版本问题,
Debian 7.0 上最新的是 1:2.6.37-3+deb7u1 , 如果默认 apt-get install openswan 就是这个版本,这时候就需要降级:
|
1 |
apt-get install openswan=1:2.6.37-3 |
配置文件这些都不用改,是一样的,重启一下ipsec和xl2tpd,再试一下,ios马上就OK了,这个问题我也是弄了好久才发现的……


近期评论